Troubleshoot a Stand-Alone License Error
When you activate your Autodesk product, only the computer that you used to activate the product is licensed to run the product. If you make certain changes to your computer, your stand-alone license might fail. You will receive a license error and you will not be able to use your product. This section discusses ways in which you can troubleshoot a license error. Some license errors require you to reactivate your product. If you need to reactivate your product, the Product Activation wizard is displayed when you try to run the product. To reactivate your product, follow the instructions in the Product Activation wizard. The following topics offer more details regarding specific errors.
Hardware Changes
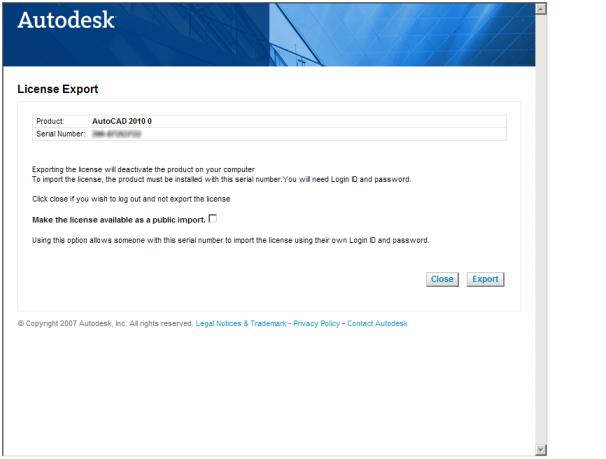
If you replace or reconfigure hardware on the computer where your Autodesk product license resides, the stand-alone license might fail. You will not be able to use your product. To prevent damage to your product license, use the License Transfer Utility to export your license file. After you make the hardware change, you can import the license file back. For instructions about using the License Transfer Utility, see Transfer Your Stand-Alone License on page 5.
NOTE If you get a license error when you change your hardware, you may have
to reactivate your license. See Activate Your Product on page 2.
Reinstalling an Operating System
If you reinstall your operating system on the computer where your Autodesk license resides, the license might fail. You will not be able to use your product. To resolve a license error in this case, you must reactivate your product. See Activate Your Product on page 2. To prevent a license error when you reinstall an operating system
NOTE If using Norton Ghost™ or another image utility, do not include the Master Boot Record.
1 Locate one of the following folders and make a backup copy:
■ (Windows XP) C:\Documents And Settings\All Users\Application
Data\FLEXnet
■ (Windows 7/Windows Vista) C:\ProgramData\FLEXnet
2 Reinstall the operating system and reinstall the Autodesk product.
3 Paste the license folder to the same location from which you originally
copied the folder in step 1.
You can now run your Autodesk product.
Changing the System Date and Time
Your product license allows for time changes to the system clock within two days of the current time. If you set your system clock back more than two days, the next time you start your product, you will receive a message that gives you the option of correcting the system clock. If you do not correct the system clock, you receive a license error.
To prevent a license error due to a change in system date and time
■ Make sure that your computer's system date and time are accurate when
you install and activate your Autodesk product.
Distributing Software Image to Multiple Computers
You can use the Deployment Wizard’s Stand-alone option to create a software installation image on your server. You can distribute this image by making it available on your computer network. During creation of this image, you are prompted for registration information, which is stored with the image and deployed to all installations. Additionally, you can manually distribute the software using the installation CD that comes with your Autodesk product. However, if your computers do not have an Internet connection, make sure the registration data for each computer matches exactly. Inconsistent registration data can cause activation
failures.
To prevent a license error when distributing software image to multiple computers
■ The distribution of applications using “ghosting” is not recommended, and can result in incomplete installations and activation problems.
Preserving Licenses on Re-Imaged Computers:
On a network license server, licenses are maintained on the server. No additional steps are needed to preserve network licenses. For stand-alone licenses, you need to export the licenses to a safe place before
re-imaging the computers. You can use the License Transfer Utility to export the licenses. After the re-imaging, import the licenses to the correct computer. Each license only works on the computer for which it was created.
When you activate your Autodesk product, only the computer that you used to activate the product is licensed to run the product. If you make certain changes to your computer, your stand-alone license might fail. You will receive a license error and you will not be able to use your product. This section discusses ways in which you can troubleshoot a license error. Some license errors require you to reactivate your product. If you need to reactivate your product, the Product Activation wizard is displayed when you try to run the product. To reactivate your product, follow the instructions in the Product Activation wizard. The following topics offer more details regarding specific errors.
Hardware Changes
If you replace or reconfigure hardware on the computer where your Autodesk product license resides, the stand-alone license might fail. You will not be able to use your product. To prevent damage to your product license, use the License Transfer Utility to export your license file. After you make the hardware change, you can import the license file back. For instructions about using the License Transfer Utility, see Transfer Your Stand-Alone License on page 5.
NOTE If you get a license error when you change your hardware, you may have
to reactivate your license. See Activate Your Product on page 2.
Reinstalling an Operating System
If you reinstall your operating system on the computer where your Autodesk license resides, the license might fail. You will not be able to use your product. To resolve a license error in this case, you must reactivate your product. See Activate Your Product on page 2. To prevent a license error when you reinstall an operating system
NOTE If using Norton Ghost™ or another image utility, do not include the Master Boot Record.
1 Locate one of the following folders and make a backup copy:
■ (Windows XP) C:\Documents And Settings\All Users\Application
Data\FLEXnet
■ (Windows 7/Windows Vista) C:\ProgramData\FLEXnet
2 Reinstall the operating system and reinstall the Autodesk product.
3 Paste the license folder to the same location from which you originally
copied the folder in step 1.
You can now run your Autodesk product.
Changing the System Date and Time
Your product license allows for time changes to the system clock within two days of the current time. If you set your system clock back more than two days, the next time you start your product, you will receive a message that gives you the option of correcting the system clock. If you do not correct the system clock, you receive a license error.
To prevent a license error due to a change in system date and time
■ Make sure that your computer's system date and time are accurate when
you install and activate your Autodesk product.
Distributing Software Image to Multiple Computers
You can use the Deployment Wizard’s Stand-alone option to create a software installation image on your server. You can distribute this image by making it available on your computer network. During creation of this image, you are prompted for registration information, which is stored with the image and deployed to all installations. Additionally, you can manually distribute the software using the installation CD that comes with your Autodesk product. However, if your computers do not have an Internet connection, make sure the registration data for each computer matches exactly. Inconsistent registration data can cause activation
failures.
To prevent a license error when distributing software image to multiple computers
■ The distribution of applications using “ghosting” is not recommended, and can result in incomplete installations and activation problems.
Preserving Licenses on Re-Imaged Computers:
On a network license server, licenses are maintained on the server. No additional steps are needed to preserve network licenses. For stand-alone licenses, you need to export the licenses to a safe place before
re-imaging the computers. You can use the License Transfer Utility to export the licenses. After the re-imaging, import the licenses to the correct computer. Each license only works on the computer for which it was created.


